The beauty of being able to create fantastic photo manipulations is being able to transport yourself and those who view your work to new worlds and redefine ‘normal’.
Sure, it’s a helpful exercise to great well blended realistic scenes, but with the power of Photoshop at our disposal why settle for realistic?
Create design is all about pushing the limits of visuals, reality, physics and imagination.
That’s why today’s lesson will teach you all the good stuff like pro blending techniques, lighting, image composites and more. However, beyond that, you’ll learn to start thinking about how to take ordinary photos and combine them into something exciting and out of the ordinary.
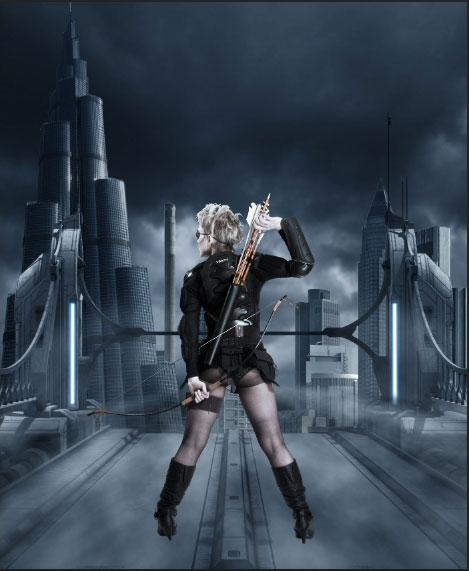
What You’ll Be Creating:
Take a look at the sleek futuristic design below. By the end of today’s lesson you’ll be able to say ‘I designed that!’.
Not only will this tutorial be a lot of fun, but you’ll learn some really handy tips and tricks along the way.

Here’s a look at the images we’ll be combining to create our masterpiece. Ready to begin? Great, let’s get started!

Resources Used In This Tutorial
Step 1
Open Photoshop and create a new file. Go to File -> New and input the following attributes.

Fill the image with Black color.

Step 2
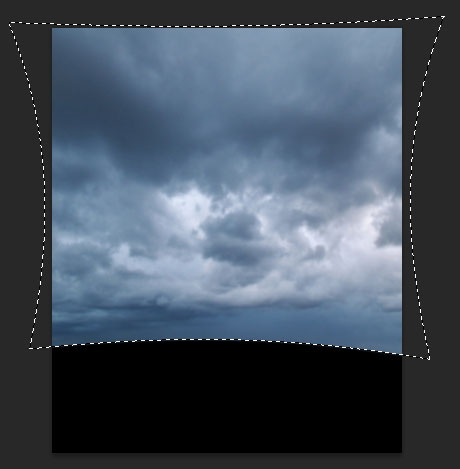
Open the Sky stock and select the whole picture by using Ctrl + A , copy and paste it to the canvas

We will transform the sky a little bit by using Transform, simply click Ctrl + T to switch to Transform then choose Warp, move the corners of the sky like this :

It should look something like this
Step 3
Apply Layer Mask to the sky.

We will desaturate and increase some contrast with these following adjustment layers.
Don’t forget to check the box “Use Previous Layer to Create Clipping Mask” so these adjustment will only be applied to the Sky layer.
Don’t forget to check the box “Use Previous Layer to Create Clipping Mask” so these adjustment will only be applied to the Sky layer.
- Hue/Saturation
Saturation : -78
Lightness : -8
Saturation : -78
Lightness : -8

Curves

Apply Layer Mask to the Curves layer.

And we will have the Sky like this :

Step 4
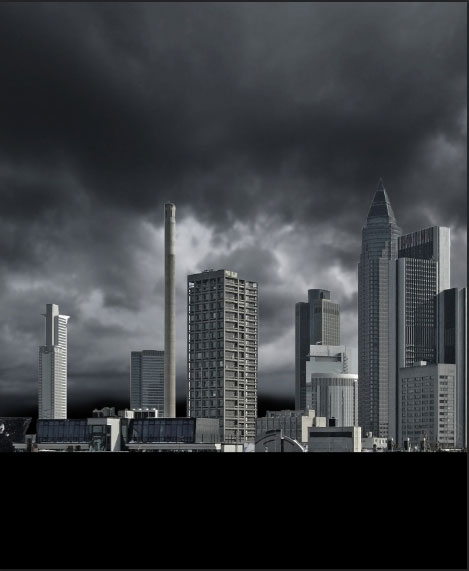
Open the Buildings image and start extract the buildings part (You can do this with Pen Tool orQuick Selection Tool)

After you’re finished, copy the extracted buildings part to the canvas and place them like this:

Step 5
We will apply these following adjustment layers for the buildings :
Brightness/Contrast
Brightness : -14
Contrast : -11
Brightness : -14
Contrast : -11

Hue/Saturation
Saturation : -75
Saturation : -75

Curves

And here’s what we will get :
Step 6
Open the Tower image and start extracting the following part :

Copy it to the canvas, resize and place it like this :

Step 7
Apply the following adjustment layers to the tower:
Hue/Saturation
Saturation : -57
Lightness : -6
Saturation : -57
Lightness : -6

Exposure
Exposure : -0.80
Offset : -0.0104
Gamma Correction : 0.77
Exposure : -0.80
Offset : -0.0104
Gamma Correction : 0.77

Curves

We will have the tower like this :

Step 8
Open the Bridge image and place it like this :

Apply the following adjustment layers:
Brightness/Contrast
Brightness : -43
Contrast : -28
Brightness : -43
Contrast : -28

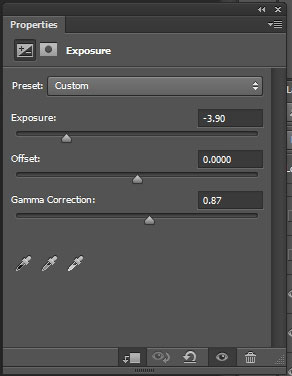
Exposure
Exposure : -3.90
Gamma Correction : 0.87
Reduce the Opacity of Exposure layer to 80%
Exposure : -3.90
Gamma Correction : 0.87
Reduce the Opacity of Exposure layer to 80%
Hue/Saturation
Saturation : -100
Lightness : -24
Saturation : -100
Lightness : -24

Curves

Color Fill with color #3f5d7a (Layer -> New Fill Layer -> Solid Color)

Change the blend mode of Color Fill layer to Soft Light, reduce Opacity to 45% and Fill to 60%
Apply Layer Mask to Exposure layer with 40% Opacity Soft Brush

We will have the bridge blended within the canvas like this

Step 9
In this step we will create a neon light for the bridge. Start doing it by create a new layer, grab the Pen Tool and draw a rectangular shape on the bridge like this:
NOTE: If you’re struggling with the Pen Tool (many good designers still do) then check out our handy guide for mastering it once and for all. Become a Master of the Pen Tool in Under 30 Minutes

Transform the drawing part into selection part by using Ctrl + Enter.

Right click at the selection part and choose Fill to fill it with White.

And we basically have a shape like this :

Step 10
Next we can create a light effect by going to the Blending Options of the rectangular layer.
Apply the following blending option settings:
Inner Glow
Color : 1467a8
Blend Mode : Normal
Color : 1467a8
Blend Mode : Normal

Outer Glow
Color : 35A8EB
Blend Mode : Screen
Opacity : 100%
Color : 35A8EB
Blend Mode : Screen
Opacity : 100%

We will have a nice glowing neon light on the bridge.
Don’t forget the other part of the bridge still need a neon light too, so simply duplicate the Neon light layer, Transform -> Flip Horizontal it then place it the bridge’s left side.

Step 11
Time to create a foggy atmosphere effect!
First, create a new layer, grab the Lasso Tool with 20px Feather and select the following part:

Second, go to Filter -> Render -> Cloud (make sure you have Foreground color as White and Background color as Black, or vise versa)
Then change the blend mode to Screen, Opacity 42%, Fill 75%.
Then change the blend mode to Screen, Opacity 42%, Fill 75%.

Here’s the result :

Step 12
We will add some fog on the bridge’s surface with the same method as above with some little change in perspective. Create a new layer and select the following part :

After filling the selection with cloud, go to Transform -> Perspective and star pulling the 2 bottom corners like this

Reduce Opacity to 54%, Fill 57%. The cloud will be in the same perspective with the surface, giving it a more realistic look.

Step 13
Apply another Color Fill with color #3f5d7a on top of all layers to give a blue atmosphere to the whole image.

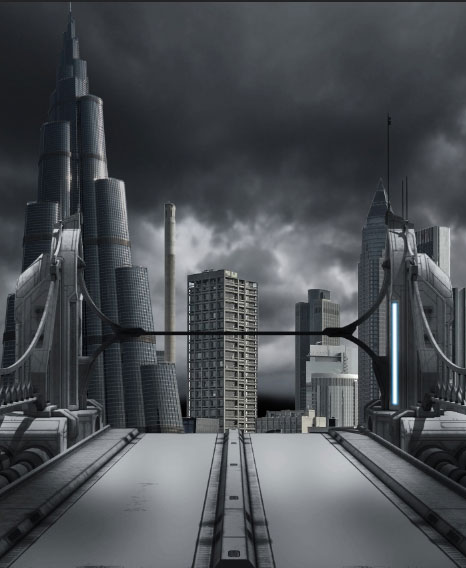
Up to this point we have generally done with the background creating steps. Here is the result so far :

Step 14
Now we will work with the main character. Open the Cyberpunk Model and start extracting the model. Paste and resize her in the canvas after you’ve finished.

Apply these adjustment layers (remember to tick the Create Clipping Mask)
Hue/Saturation
Saturation : -59
Lightness : -13
Saturation : -59
Lightness : -13

Curves

Brightness/Contrast
Brightness : 1
Contrast : 61
Brightness : 1
Contrast : 61

Color Fill with color #3f5d7a
Change the blend mode to Color Dodge – Fill 75%
Change the blend mode to Color Dodge – Fill 75%

Apply a layer Mask to hide part of the Brightness/Contrast layer

Here’s what we will have :
Step 15
Start creating a shadow for the model by dupicate the Model layer, hold Ctrl and click on the duplicated layer to create selection, fill it with Black

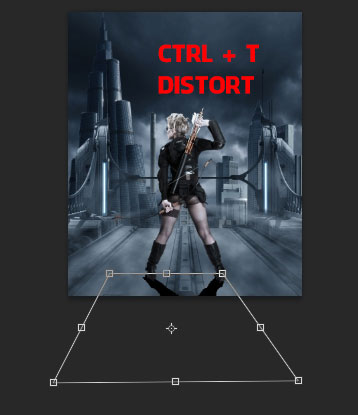
Next, go to Transform -> Distort and start pulling two upper corner down like this :
Go to Filter -> Blur -> Gaussian Blur, 2.5px.

Set the blend mode to Soft Light – Opacity 68% – Fill 72%.
The shadow will now look like this :

Step 16
Create a new layer and tick Create Clipping Mask, grab a soft brush with Black color and start painting these following parts of the model :


Reduce the Opacity of this layer to 46%.

Step 17
Open the Terminator’s Corpse image and paste it into our image.

Apply adjustment layers to the corpse layer:
Brightness/Contrast
Brightness : -26
Contrast : 40
Brightness/Contrast
Brightness : -26
Contrast : 40

Hue/Saturation
Saturation : -67
Lightness : 13
Saturation : -67
Lightness : 13

Color Fill with color #3f5d7a
Change the blend mode to Color Dodge – Fill 75%
Change the blend mode to Color Dodge – Fill 75%

And here is the result :

Step 18
Create a new layer under the Corpse layer and paint some black color :

Change the layer to Soft Light – Opacity 68% – Fill 72%. We will have nice corpse’s shadow.

Step 19
It’s lightning time! Open the Lightning image and select the following part :

Paste it to the canvas, move the layer down just above the Sky layer and rotate it to this position :

Apply some adjustment layers for the lightning
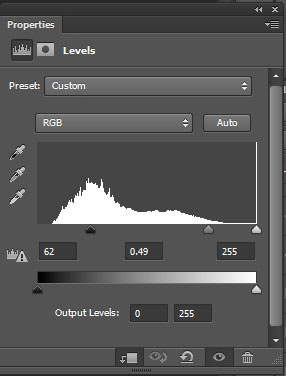
Level
Level
Hue/Saturation
Saturation : -100
Lightness : -41
Saturation : -100
Lightness : -41

Brightness/Contrast
Brightness : 4
Contrast : 100
Brightness : 4
Contrast : 100

Change the Lightning layer to Screen mode and here’s the result :

Step 20
In these following steps we will make several changes to the image’s overall lightning.
First, create a new layer, grab a White soft brush and start painting the following part :

Change the blend mode to Overlay – Opacity 30% – Fill 30%

Go to the Buildings layer, create a new layer, tick on Create Clipping Mask and paint some white color on top of those buildings :
Set the blend mode to Overlay – Opacity 75%
Next, change to Black soft brush and paint the bottom of the buildings :
Next, change to Black soft brush and paint the bottom of the buildings :

Change blend mode to Soft Light – Opacity 90%
And here is what we will get :
And here is what we will get :

Step 21
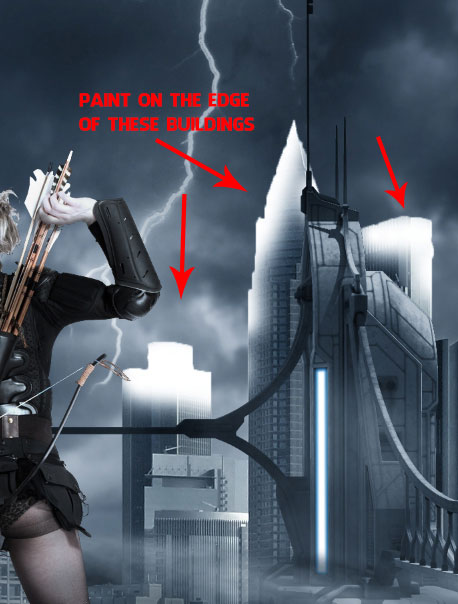
Add the same type of lighting to the tower, create a new layer and paint white color at the tower’s right side :

Set the blend mode to Overlay – Opacity 50%

Create another layer and paint more white color :

Change to Overlay – Opacity 70% – Fill 67%

Back to the coprse layer, create new layer and paint some black color to this part :

Change the Opacity to 60% – Fill to 77%
Step 22
Download and open the Lightning brush, paint some lightning on the corpse like this:

Apply the following Blending Option to all lightning layers. You can do this fast by applying to one layer, then right click on it and choose Copy Layer Style, right click on other layers andchoose Paste Layer Style.
Outer Glow
Blend Mode : Normal
Opacity : 100%
Color : #4590ED
Size : 3
Blend Mode : Normal
Opacity : 100%
Color : #4590ED
Size : 3

Group all the lightning layers by holding Ctrl and click on all of them, then Ctrl + G. Duplicate the group for better lightning opacity.

Step 23
Alright we need some evidences that our model just killed a Terminator! Open the Arrow stock, select the arrow and start placing it on the corpse :

Duplicate the arrow a few more time and placing them around the corpse. Also apply layer mask on each of them like this :

Group all the arrow layers into one and apply these adjustment layer on it :
Hue/Saturation
Saturation : -58
Lightness : +5
Hue/Saturation
Saturation : -58
Lightness : +5

Photo Filter (Cooling Filter 80)

Here is the result :

Step 24
Open the Lens Flare stock and grab this one :

Paste and rotate it to this part :

Set the blend mode to Linear Dodge and apply Layer Mask :

Create a new layer and pick the soft brush with color #D9F5F6 and paint like this :

Change the blend mode to Soft Light with 50% Opacity and we should have a nice glowing effect on the model’s bow

Step 25
We will add some shadow to the bottom by creating a new layer, grab a black soft brush and paint the bottom of the image like this :

Apply Layer Mask :

Create a new layer, click Ctrl + A to select and create Cloud effect like we just did before (Filter -> Render -> Cloud)

Change the blend mode to Screen – Opacity 35% – Fill 20%.
Apply Layer Mask to the layer :
Apply Layer Mask to the layer :

And we will have some nice fog effect :

Step 26
We’re almost done! Time for some final touches. Apply the following adjustment layers:
Brightness/Contrast
Brightness : 3
Contrast : 16
Brightness : 3
Contrast : 16

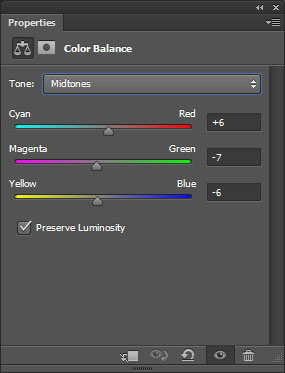
Color Balance


Brightness/Contrast
Brightness : 83
Contrast : 6
Brightness : 83
Contrast : 6

Level

Selective Color


Step 27
Be sure to apply the following layer mask to the second Brightness/Contrast adjustment layer :

Go back to the model layer, create a new layer with Create Clipping Mask, paint the color#8ca7c8 on the model like this :

Change the blend mode to Linear Dodge – Opacity 80%

Go back to the corpse layer, create a new layer with Create Clipping Mask, paint some White color on the corpse :

Set the blend mode to Soft Light – Opacity 40%

Congratulations, You’re All Done!
Awesome job making it this far! You should be proud of what you’ve created. Show it off to your friends and colleagues and get some feedback.
You can also comment here with your version, or any questions you had about the techniques used. We love to see what you guys create and we’re always here to give helpful feedback and tips to help you to improve.
St...PSD


0 Nhận xét:
Đăng nhận xét